Integration of Database Seeder in laraval 9
Introduction
Laravel seeder is used to add fake add in database table Here you will learn how to generates fake or dummy data for you and incorporate the data in the database table.I will guide you on How to create Seeder, What is the command for Database Seeder and How to run Seeder in Laravel .
Install Laravel Project
Eventually, to show you the demo of database seeder in laravel, we need to install a fresh laravel project from the beginning. If you want, you can skip this step, but only if you have already installed the application.
composer create-project laravel/laravel:^9.0 laravel-seeder --prefer-dist
Above, command conjugate entire project files in one folder. Then, we have to get inside the project folder.
cd laravel-seeder
Establish Database Connection
We have established a new laravel project, and the further step is to set up a database with MySQL. We write the entire memoir inside the MySQL database, such as creating a database, table, or seeding the values inside the table.
Open your .env file and place the following code, it makes the frequent connection between laravel and database to manage the data.
DB_CONNECTION=mysql
DB_HOST=127.0.0.1
DB_PORT=3306
DB_DATABASE=laravel-seeder
DB_USERNAME=root
DB_PASSWORD=
Rename database name according to you need . I rename it 'laravel-seeder' because it is my project name.
After that run project with command -:
php artisan serve
Manage Model and Migration
After project is setup. As per the MVC framework ,the Model is believed to handle the business logic of the application. Model is a foundational class that preferably describes the logical architecture and relationship of a data table in the database.
You must also know that every data table has a corresponding model, which communicates data.
Run artisan class to create an Employee model:
php artisan make:model Employee -m
With above command model and migration with for employee.
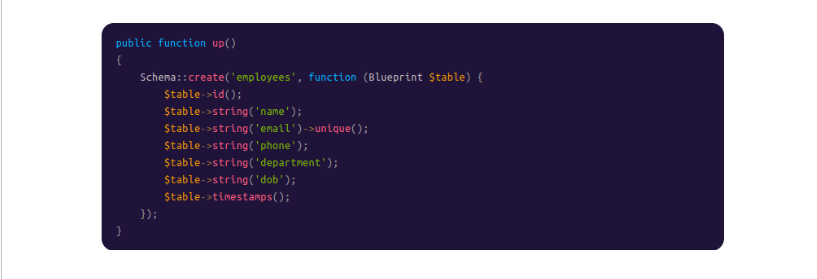
Open database/migrations/timestamp_employee_table.php file and add the given below code.
After add code in this file then run command -:
php artisan migrate
This will create employee table in database.
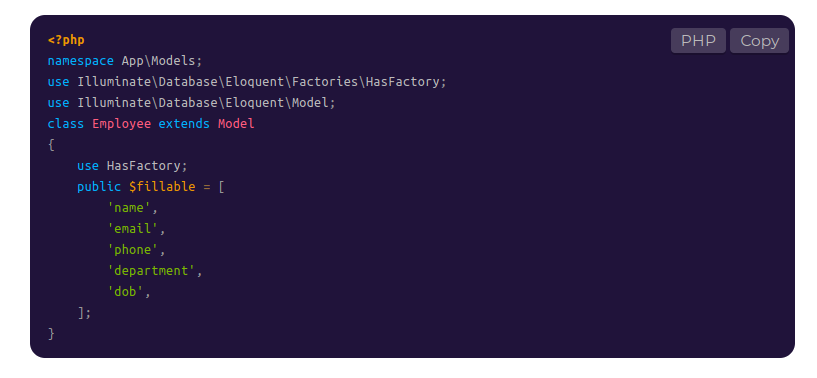
After that in open app/Models/Employee.php and define the modal values in the $fillable prop.
Create Seeder
We have to run the following command to create the Seeder specifically for the Employee table.
php artisan make:seeder EmployeeSeeder
Ultimately the above command generated the seeder in the database/seeds/EmployeeSeeder.php file. No wonder, if you create more seeds, then they will also be kept here.
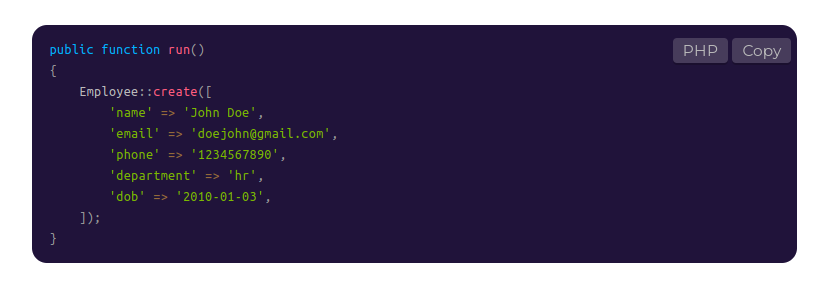
So, we have configured the following values that will be stored in the database.
name
phone
department
dob
Calling Additional Seeders
The call method is used to execute additional seed classes within the DatabaseSeeder class. It allows you to break up your database seeding into multiple files so that no single seeder class becomes too large. The call method accepts an array of seeder classes that should be executed.
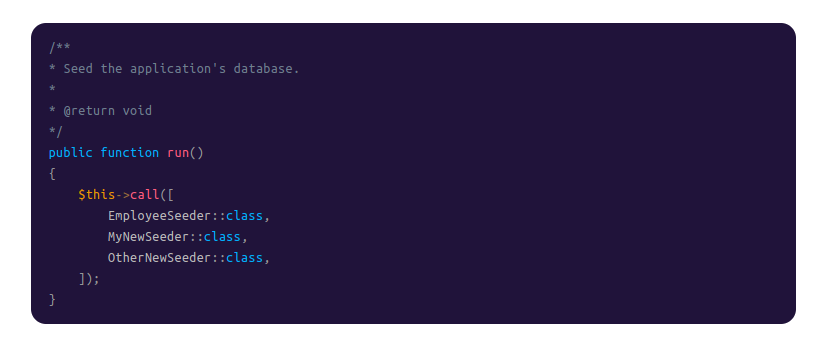
Here i am extra seeder if you want to call multiple you can call like this , if you want to call single seeder then comments the MyNewSeeder and OtherNewSeeder.
Running Seeders
After you create and call seeder then you can run seeder by using following command-:
php artisan db:seed
This command run all seeder and add dummy data in emolyee tabel .
If you want run single seeder like run only employee seeder then use this command -:
php artisan db:seed –class=EmployeeSeeder
You can also seed your database using the migrate:fresh command in combination with the –seed option. This command drops all tables, re-runs all of your migrations, and re-building your database.
php artisan migrate:fresh --seed
Conclusion:
This way, you can create a database seeder in Laravel. You use this data in your project for testing etc.